Integrating Entity Framework with Avalonia UI Using SQLite: A Gentle Introduction
Have you ever wanted to add data persistence to your Avalonia UI project but weren’t sure where to start? If you’re new to Avalonia or Entity Framework, integrating a database might seem daunting. Fear not! In this guide, we’ll walk through how to seamlessly integrate Entity Framework Core with an Avalonia MVVM project using SQLite.
Why Use Entity Framework Core with Avalonia?
Avalonia is a fantastic framework for building cross-platform desktop applications with .NET. However, to make your application truly dynamic and data-driven, you’ll likely need a database. That’s where Entity Framework Core (EF Core) comes in. EF Core simplifies database operations by allowing you to work with data using C# classes, eliminating the need for most SQL queries.
Getting Started
Setting Up Your Avalonia Project
First things first, make sure you have an Avalonia MVVM project set up. If you haven’t created one yet, you can use the Avalonia templates. We’ll be using version 11.0.10 in this example.
Installing Necessary Packages
Adding Entity Framework Core Packages
To get started with EF Core and SQLite, we’ll need to install a couple of NuGet packages. Open your terminal or use the Package Manager Console in your IDE and install:
- Microsoft.EntityFrameworkCore.Sqlite allows EF Core to work with SQLite databases.
- Microsoft.EntityFrameworkCore.Tools provides tools for migrations, which we’ll use to create our database schema.
Creating Your Data Models
Defining Your Entities
In your project, navigate to the Models folder. Here, we’ll create our data models.
What’s Happening Here?
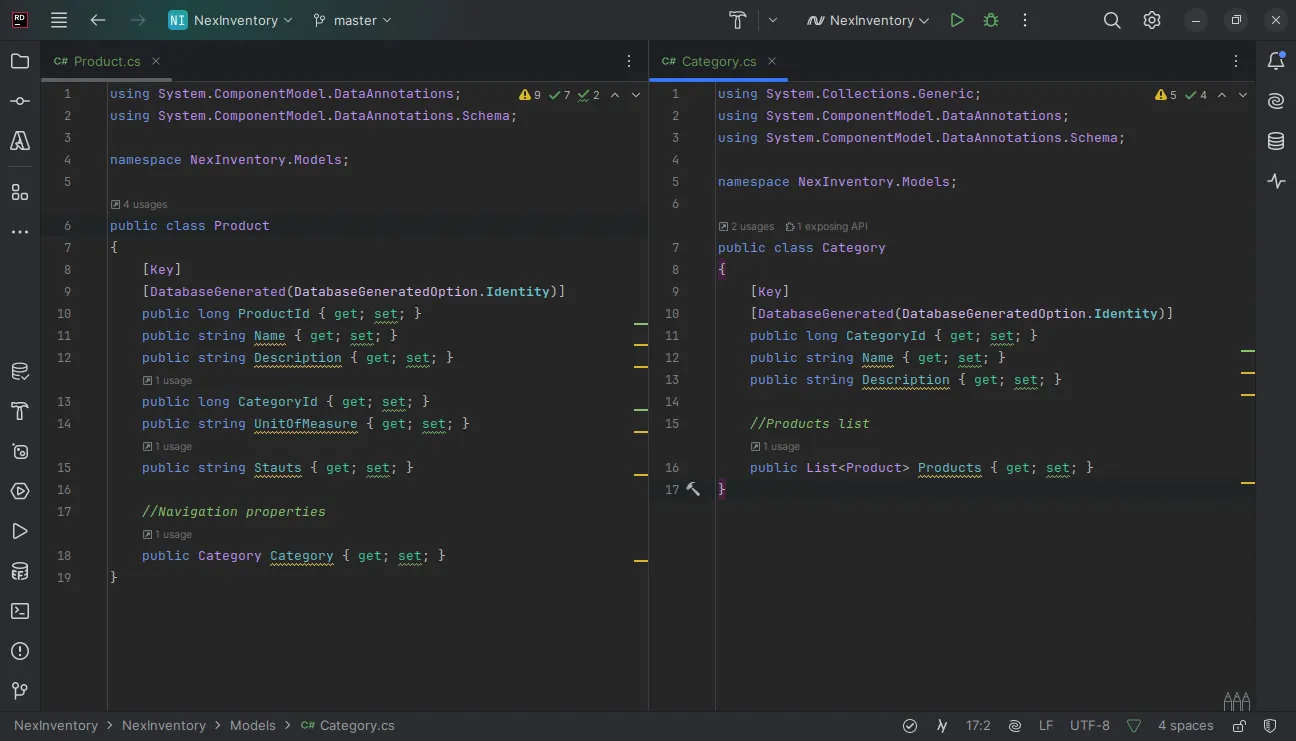
- [Key] denotes that Id is the primary key.
- [DatabaseGenerated(DatabaseGeneratedOption.Identity)] ensures that Id is auto-incremented by the database.
Creating the Context Class
Next, we’ll set up the database context, which manages the connection to the database and handles data operations. Create a new folder called Data and add a class ApplicationDbContext.cs:
using Microsoft.EntityFrameworkCore;
using NexInventory.Models;

namespace NexInventory.Utils;

public class ApplicationDbContext : DbContext
{
    public DbSet<Product> Products { get; set; }
    public DbSet<Category> Categories { get; set; }

    protected override void OnConfiguring(DbContextOptionsBuilder optionsBuilder)
    {
        optionsBuilder.UseSqlite("Data Source=NexInventory.db");
    }

    protected override void OnModelCreating(ModelBuilder modelBuilder)
    {
        base.OnModelCreating(modelBuilder);

        //Configure the relations
        modelBuilder.Entity<Product>()
            .HasOne(p => p.Category)
            .WithMany(c => c.Products)
            .HasForeignKey(p => p.CategoryId);

        //Configure additional columns
        modelBuilder
            .Entity<Product>()
            .Property(p => p.Stauts)
            .IsRequired()
            .HasDefaultValue("Active");
    }
}
Breaking It Down
- DbSet Properties:
DbSet<Product>andDbSet<Category>represent the Products and Categories tables in our database.
OnConfiguring Method:
- We override
OnConfiguringto specify the database provider and connection string. optionsBuilder.UseSqlite("Data Source=MyAwesomeApp.db");tells EF Core to use SQLite and specifies the database file.
OnModelCreating Method:
We override OnModelCreating to configure model relationships and additional properties.
Configuring Relationships:
modelBuilder.Entity<Product>()targets the Product entity..HasOne(p => p.Category)indicates that a Product has one Category..WithMany(c => c.Products)means that a Category has many Products..HasForeignKey(p => p.CategoryId)specifies CategoryId as the foreign key in the Product entity.
Configuring Additional Columns:
modelBuilder.Entity<Product>().Property(p => p.Status)targets the Status property of Product..IsRequired()makes the Status property required..HasDefaultValue("Active")sets the default value of Status to “Active”
Why This Matters
- Explicit Configuration: While EF Core can infer many relationships and configurations by convention, explicitly defining them ensures your database schema matches your expectations.
- Relationships: Configuring the one-to-many relationship between Category and Product allows for proper foreign key constraints and navigation properties.
- Default Values and Constraints: Setting default values and required fields at the model level ensures data integrity in your database.
Creating the Database
Now comes the exciting part — creating the database based on our models.
Using Migrations
We have two options to create the database schema:
- Using Command-Line Tools
- Using Visual Tools in Your IDE
Option 1: Command-Line Tools
Adding a Migration
Run the following command to create a new migration:
dotnet ef migrations add InitialCreateThis command generates code to create the database schema from your models.
Updating the Database
Apply the migration to create the database:
dotnet ef database updateIf everything goes smoothly, you should now have a MyDatabase.db file in your project directory. This is your SQLite database!
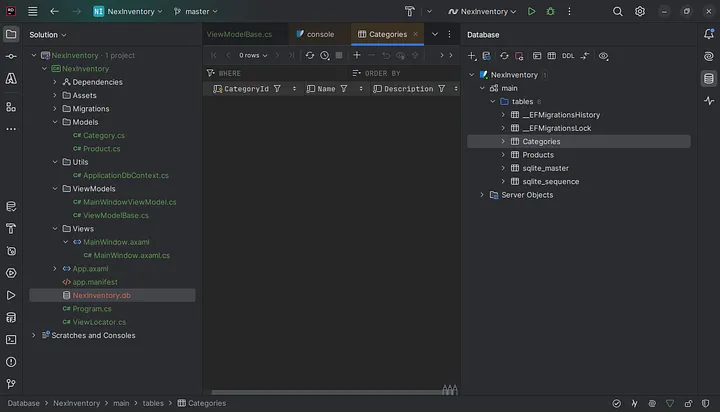
Option 2: Using Visual Tools
If you prefer a graphical interface, many IDEs like Visual Studio or Rider offer built-in tools for managing migrations.
 This achieves the same result as the command-line tools but within your development environment.
If you’re doing everything correctly, including the migration and updating of your database, you will find a new database in the project directory with the declared structure. Following these steps is as simple as it gets.
Dealing with Common Issues
Error: Missing Microsoft.EntityFrameworkCore.Design Package
Encountering Errors?
You might run into an error like:
Your startup project '[projectName]' doesn't reference Microsoft.EntityFrameworkCore.Design. This package is required for the Entity Framework Core Tools to work.
Why Does This Happen?
This error occurs because the Entity Framework Core tools require the Microsoft.EntityFrameworkCore.Design package to function correctly during design-time operations like migrations.
The Fix
Simply install the missing package:
dotnet add package Microsoft.EntityFrameworkCore.DesignConflict with Avalonia.Diagnostics
Understanding the Issue
Sometimes, when you try to install Microsoft.EntityFrameworkCore.Tools or Microsoft.EntityFrameworkCore.Design, you might encounter errors like:
[Notification][Install] Install failed (project: [projectName], package: Microsoft.EntityFrameworkCore.Tools vX.X.X)
Package restore failed. Rolling back package changes for '[projectName]'.
Detected package version outside of dependency constraint: Microsoft.CodeAnalysis.CSharp.Scripting 3.8.0 requires Microsoft.CodeAnalysis.Common (= 3.8.0) but version Microsoft.CodeAnalysis.Common 4.8.0 was resolved.
Detected package downgrade: Microsoft.CodeAnalysis.CSharp from 4.8.0 to 3.8.0.
Why Does This Happen?
- Dependency Conflicts:
Avalonia.Diagnosticsdepends on older versions of certain packages (likeMicrosoft.CodeAnalysis.CSharp.Scripting 3.8.0), whileMicrosoft.EntityFrameworkCore.Designand Tools may require newer versions (like4.8.0). - Version Mismatches: These conflicting dependencies cause the package manager to fail to resolve the correct versions, leading to installation errors.
How to Solve It
The simplest solution is to remove the Avalonia.Diagnostics package from your project:
dotnet remove package Avalonia.DiagnosticsWhy Remove Avalonia.Diagnostics?
- Resolves Conflicts: Removing this package eliminates the dependency conflicts, allowing you to install
Microsoft.EntityFrameworkCore.Toolsand Design without issues. - Unblocks Development: It enables you to run EF Core migrations and continue building your application.
But What Do We Lose?
- Development Tools Only:
Avalonia.Diagnosticsprovides diagnostic tools that are only available during development. They are not included in production builds, so removing it doesn’t affect your end users. - UI Inspector: A tool to inspect and modify the visual tree of your application at runtime.
- Performance Monitoring: Helps identify and diagnose performance issues.
- Data Context Inspection: Allows examination of data bindings and contexts.
Is It Worth It?
Absolutely! Here’s why:
- Minimal Impact on Application Functionality: Removing
Avalonia.Diagnosticsdoesn’t affect the core functionality of your Avalonia application. - Alternative Tools Available: You can use other profiling and debugging tools like dotTrace, ReSharper, or Visual Studio’s built-in profilers.
- Development Strategy: You can keep
Avalonia.Diagnosticsduring the initial stages of development for front-end design and debugging. When it’s time to perform migrations or scaffolding with Entity Framework, temporarily remove the package.
Final Thoughts on Removing Avalonia.Diagnostics
- Removing it is a practical solution to resolve dependency conflicts.
- It doesn’t hinder your ability to develop or run your application.
- The loss of built-in diagnostic tools is manageable with alternative solutions.
Using the Database Context
Interacting with Your Data
Now that our database is set up, let’s see how to use it in code.
Adding Data
using (var context = new ApplicationDbContext())
   {
       var newCategory = new Category
       {
           Name = "Electronics",
           Description = "Electronic gadgets and devices"
       };

       context.Categories.Add(newCategory);
       context.SaveChanges();

       var newProduct = new Product
       {
           Name = "Smartphone",
           Description = "Latest model smartphone",
           CategoryID = newCategory.CategoryID,
           UnitOfMeasure = "Piece",
           Status = "Active"
       };

       context.Products.Add(newProduct);
       context.SaveChanges();
   }
What’s Going On?
- We create an instance of
ApplicationDbContextto interact with the database. - We use
AddandSaveChangesto insert new records. - We use
ToListto retrieve all products from the Products table.
Wrapping Up
And there you have it! You’ve successfully integrated Entity Framework Core with your Avalonia UI project using SQLite. We’ve also covered how to handle common errors, like missing packages and conflicts with Avalonia.Diagnostics.
Key Takeaways:
- Removing Avalonia.Diagnostics is a practical solution: It resolves dependency conflicts without affecting your application’s functionality.
- Development Tools vs. Production Needs:
Avalonia.Diagnosticsis only used during development and isn’t necessary for your application to run. - Alternative Tools Are Available: You can still profile and debug your application using other tools.
Where to Go from Here?
- Explore More EF Core Features: Look into querying with LINQ, updating records, and handling relationships between entities.
- Enhance Your UI: Bind your data to your Avalonia views to create a dynamic user experience.
- Consider Architectural Patterns: Implement repositories or services to manage data access more effectively.
Final Thoughts
Integrating a database might seem challenging at first, but with the right tools and a bit of guidance, it’s entirely manageable — even enjoyable! By understanding how to resolve dependency conflicts and knowing that removing Avalonia.Diagnostics doesn’t hinder your application’s performance or capabilities, you can confidently move forward with your project.
Remember:
- Your users won’t be affected: Since
Avalonia.Diagnosticsis not included in production builds, removing it won’t impact the end-user experience. - Development Flexibility: You can develop your front end with
Avalonia.Diagnosticsand remove it when necessary for migrations. - Alternative Solutions: There are plenty of other tools available to help you debug and profile your application effectively.
Feel free to share your thoughts or ask questions in the comments below. Happy coding!
P.S. If you found this guide helpful, consider sharing it with others who might benefit from it. Together, we can make software development a bit less intimidating for everyone.